Search

Thursday 8 August 2013

On: UDK Units and landscape sizes

I see this question gets asked a lot.
Mostly when someone asks something like:
"UNITS IN UDK????!!!!!1"

They are given the answer 1max Unit = 1UDK unit. This is correct.

But people occasionally don't understand this, and this confusion arises because what they really wanted to know is:
"What are the real world units of the default assets in UDK?"
Now this is a different question entirely.
You see the first question assumes you're making your own units and you could simply say to yourself that I'm going to make 1unit = 1cm in game or i'm going to make 2cm = 1 unit in game.
and there is nothing wrong with that. 1 max unit = 1 unit in game. In other words whatever you set is the correct scale, you choose.

Quote:
"In all of the Unreal Tournament games, 1 Unreal Unit is equal to 2 cm.
In Gears of War approximately 2 Unreal Units equal 1 inch, because the characters are 156 units tall and a floor of a building is 256 units tall. This was decided on for grid purposes and so our cover height worked out well.
The values for gravity were not based on reality, but on what felt right.
Most licensees use a scale of 1 Unreal Unit to 1 cm" From UDN page

Landscape Scale

Okay now something not many people went over... you could always check the documentation but who has time for that.

A landscape is made up of 3 things, components, sections and quads. But what are they?

Component
The component is part of the overall landscape, they can be edited and deleted unlike other parts.
More components = lower performance  Max recommended by epic is 1024 components.
Sections
Each component is split into sections, the number of section per component is an absolute value. That is to say 4 sections per component mean the component is split into a 2x2. Think of the section as the largest possible square that can be made LOD wise. That is when you a re furthest away you see only the sections.
Quads
The Sections are further split into 3 as the LOD increases, until the number of quads is reached. Now this is where it gets confusing because the number of quads per section is the number of quads lengthways. That is to say the total number of quads is the number of quads per section squared.
Each quad is 128 unreal units in length.

So multiply each length together:

The number of quads per section x the number of components in a length x number of sections in a length must = the number of vertices-1


Where
q= Number of quads
c= number of components
s= number of sections
v= vertices
L= total length of landscape
K= total size in quads

Therefore:

K = q x Sqrt(c) x Sqrt(s) =  v-1
L=128K

Now that you can calculate the length you can accurately place landscapes adjacent to each other.  

Example

I want a landscape of 1 square mile
The scale I'm using is 96uu=6feet thus 1uu=1/16ft
 1 mile = 5280 feet therefore I need 5280*16= 84480 unreal units in length

L=128K
84480=128K
K=660=v-1
V=661

typing this into the landscape editor gives us  15 quads 4 sections and 484 components
therefore it is compatible and possible.

I.e K=15*Sqrt4*Sqrt484=15*2*22=660

That means that each length will have 22 components. 22*2=44 sections and 44*15=660 quads

Each component will have 30 quads and will be of a size 3840uu squared or 240 feet squared.

484 components is a high number, not over the max but it may be desirable to go with a larger mesh with fewer components. such as a 1009x1009 mesh. 

Friday 26 July 2013

The Buntline

Not to be confused with the 1930's buntline special


Can't help but think "Over-compensating much?"
This stupid-yet-awesome gun is connected to a myth. Confusingly the "1873" is not the date it began production. Uberti was not even founded until the end of the 1950's. The company makes replica firearms from history. So... when was it created you say? Well... sometime after 1959. But that's not important. What's important is the Legend. See the gun was made to resemble the Colt Buntline Special.

The Legend goes that Ned Buntline, an accomplished author and journalist in 19th century America commissioned 5 guns to Colts manufacturing company. All to be sent to 5 well known peace keepers the guns were based off of the colt peacemaker however they boasted 12" barrels.


The origin comes from a biography of one of the supposed peace keepers: Wyatt Earp. There is little to no evidence to support this story however. It's apparent 2 of the 5 lawmen were not even lawmen at the time.

Colt recreated the gun in the 1950's due to customer demand.

As for the actual CG aspects, This is the High-Poly model of a gun I'm creating for a game. I also haven't included the back sight on this model. it's not textured but rather I just stuck some of my personal materials onto the model to quickly get an Idea of what it'll look like in the end.

Saturday 13 April 2013

On: Getting shit done faster.


Introduction:

The main thing you want to be focusing on when developing games is getting shit done. Let's face it: you're probably not in a huge company with 90 people working on the game and it's much more likely you only have a few people. Maybe you don't even have that, maybe you're all by yourself. Fact is that although you could probably create an awesome asset that looks mega realistic and has awesome performance: it's never going to matter if it takes you a week to finish a barrel.
     If later you find you have the time to go back and fix up some of the objects to perfection, then then that's pretty awesome too.
     Saying that however  many people I speak to seem to be under the impression that saving time is completely based on experience and the process of modelling. This is why for this first part we will not be discussing modelling techniques (that shall come at a later date), but rather organisation and management. The plan is that In Part II I will discuss Speed modelling Techniques as well as give some challenges and guidelines to help you practise and Finally in Part III I will discuss ways to speed up your texturing workflow.
     I'll be using 3ds max as a main example however many if not all of the practices can be brought over to other  packages.  This Volume is aimed at intermediate to advanced users however I attempted to make much of the article beginner friendly by giving hints and suggestions.


Planning:

Lists;
Plan a rough guide of how you'd like your Scene on paper/in photoshop
You need a list of things you'll need to model. A simple indoor scene might involve:
Add to this list as you go and cross off that which is done. This way you'll not be wondering what to make next

Figure out Pipeline(s):

EXAMPLE: Don't use this make your own. Make it neater.

Don't  waste your time wondering what to do next. Write down your processes. It can get pretty complicated and while you may have it drilled into your head. Having a checklist that you can work through can keep you on track. No more "Oh monkey-wank I forgot to set the smoothing groups... time to re-render."

The example shown is just a quick and crappy example of  *1* Pipeline for *1* method of creating assets. If you incorporate Zbrush/Mudbox, substance designer or Ddo etc, your pipeline will probably include that. If your game engine has special requirements, for eg; say your game engine can't hand single smoothing groups then this should also be included somewhere. Find what works for you; maybe you model more quickly by making the High poly Mesh first?

One final tip: you can create a flowchart-style pipeline which covers more options, makes it easier to read and looks neater. Which is cool and cool is good.

Time Management;

Managing your time can be one of the most crucial ways to save time. Write yourself realistic deadlines and assess if you're making them. Essentially saying to yourself this week/fortnight I want to get X amount of work completed. 

It's also a good idea to take note of the time of day you're most efficient. Take this into consideration and set day by day goals. It's a good idea then to give yourself bigger more elaborate tasks in the time you work best and smaller easier tasks in the time you don't work so well. Remember to pace yourself; if you're not meeting deadlines assess the cause, that is to say is it due to a lack of input by you or is it due to your goals being unrealistic?   

Try to do Something everyday. Even if it's just for 20 min or so. 

Save your progress:

Backup your work, save and do it often. People lose their work all the time due to file or hard drive corruption, accidentally deleting a file or simply just making a huge undoable mistake such as for example; resetting Xform when you really shouldn't have. Save your file to your hard drive and back it up on a USB, external Drive or cloud based storage. Get into the habit of hitting ctrl+S often I think I've said enough. 

Optimise your Setup:

To Speed up our workflow we'll first be looking at eliminating repetitive tasks. Reusing your old assets isn't 'cheating', nor is starting from anywhere that isn't scratch. So let's get our setup configured and our resources sorted. 

Set up your Default Scene (3ds Max)
Every time we start a new project things need setting up. We can set up a default scene. 

Grid settings are accessed by right clicking snaps.
The Grid
Hint:Right Click the Snaps Icon at the top and then navigate to Home Grid.
In Game development we work a lot with powers of 2, So it only stands to reason that we should set up our Grid to work as such.
Set up your grid spacing to be a power of 2: in this case I used a power of 4 which gives me 16;
Note: The perspective view grid extent is how many iterations the grid should extend in perspective view. I.e. Smaller number - >smaller grid. Make sure to check 'All viewportsor set them all up individually.

Unit Setups;
Cryengine and UDK:  1 max unit => 1 unit in Game engine.
Customise => unit setup => Generic Units
Done.

Reference Box;
The Reference box is used for an Idea of scale. Since we'll be using the grid for large objects we should keep it a small size. 64 cubed is a size... but then 96 high with a 32 x 32 base is also the size of a 6ft person with the UDK assets. So maybe you'd like to use that as a reference. Or maybe some other reference.   

Other Objects;
You may also wish to add other objects such as light setups, eg. a skylight for baking AO. 

Gamma Setup and exposure
"Adopt files gamma and LUT settings" Should I?
Gamma and LUT settings are nice for rendering out scenes in max. But as far as games go: it messes things up. Disable it. 
To elaborate: Gamma changes the levels on images automatically, to make them look better. But it messes up normal maps and gives false results.
Hint; Gamma can be found under Customize => Preferences => Gamma and LUT tab.
Exposure is pretty much the same thing except it's to replicate camera settings or something, who cares it screws up our render to textures so disable it.
Hint; Exposure can be found under Rendering => Exposure Control (Set to no exposure control)

Viewport Setup;
In 2013 you have the ability to switch viewport configurations. I hardly ever stray from my 2
viewport setup one for modelling and one if I require a second view (Such as when building from 2 references). There was a time when I would also have a separate view exclusively to display a reference/ List of commands I would be trying to memorise or a Pipeline.

Hint; You can find viewport setup by clicking the + icon in top right of viewport then going to configure viewports.

 
Save the file;
After you've fiddled around with your default file and set it up so you like it. save it in your [documents\3ds max\scenes] folder (or your project folder, which I'll go over in a second) as [maxstart.max]
Henceforth every time you open 3ds max the default scene will load. 
Note: if you choose 'new empty scene' at the welcome screen then any geometry or other objects you have in your scene will not be loaded. 

Miscellaneous


Project folders;
If you're constantly getting sick of having to spend a lot of time browsing for rendered textures and files etc. Then you should organise a project folder.
A project folder becomes the default location for all of max's files. It makes folder management far easier than looking all over your hard drive. Once you are done with modelling the final files can be moved to your game engine directory.
Be sure to copy byour maxstart.max into your new scenes folder.

Hotkeys and interface;
Clicking is slower than using hotkeys, So set up your hotkeys and use them you shouldn't need to spend time looking for modifiers or tools. In the future after using hotkeys for long enough you can spend a lot of time in expert mode (Ctrl+X)

Search the internet for a tutorial on how to set up hotkeys if you need to. 
Hint: you can find the menu under [customize => customize user interface]. 


Make once, Use many times - Libraries
Model Libraries;
There is no reason for you to constantly be modelling screws, knots,bolts etc.
keeping a model library of these little bits and bobs we use in many projects is a great way to save time. This library can be as simple as making a new folder in your project folder

Alternatively you may consider using This script to create your own primitives. One thing to note: this script creates new plugins and the primitives will be stored where you select to store them. I.e they're not stored in the script. 

fig 1.
Material libraries;

There's a common misconception when it comes to material libraries that is that they are only available for mental ray. They get this notion from the fact that the Autodesk material library requires mental ray. So let me make this clear: material libraries are not mental ray exclusive.

So how do we use them? you ask. Well it's quite simple: 

hint you can find the material editor by going to rendering => Material editor or simply by pressing [m] on the keyboard. 

Right click in the material/Map browser (left hand side of screen in slate editor and you can open this by going to material=> Get material in the compact material editor.)
Here you can make new material libraries and open existing ones. You can also experiment with groups and other stuff but let's stick to the basics for now.  

Create a new material it can be whatever you like I created a red and a blue material. And Create a new material Library.   

Fig.2 Put to library button.

 From here it's as simple as Clicking the 'put to library' (shown in fig 2.)  in the compact material editor. Or dragging and dropping the material in the Slate editor Mode.


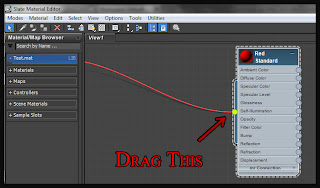
Side note: Many people also don't know how to drag and drop materials in the slate material editor. To do so simply drag from the output node as shown in figure 3. Though please note that my nodes go from right to left so as to resemble that found in the UDK.

Figure 3. Dragging and dropping in Slate editor.


Finally don't forget to save your material libraries by right clicking the material library going to the top option and clicking save. Once saved you can call on them very quickly without needing to remake the whole thing for every new scene you create. Better still save the library to your default file. Furthermore you may wish to create a collection of bump maps, and other such things. We'll talk more about how to use these materials to gain quick results in a later article.


Generic Libraries;
In windows 7 you can make a new library for quick access to these files. Open up windows explorer (Use the shortcut Win key + E). Find the libraries folder in the left panel. From here click new library (Shown right). Name your new library (I named mine game assets). Right click => properties. Add the folders you wish to include


Build your texture and reference libraries;
As you collect free-to-use textures and references place them in neatly organised folders for later use. This will save you a tonne of time searching for a new rock material or scratched metal material.


This is it for part 1. In the next part I'll actually get into some Modelling tricks and tips.

-Fuzz out


Disclaimer: The content on this blog is for informational and learning purposes only. The owner makes no assertions as to the accuracy or completeness of any information on this site or found by following any link on this site.. The owner will not be held liable for any damages, losses or injuries that may occur due to the articles on this site .The owner will not be liable for any errors or omissions on this site. This policy is subject to change at any time without notice.